

배경 상황
지금 회사에서 Bedrock과 여러 생성형 AI 서비스를 활용하고 있는데 사용 목적별로 비용을 분리해서 집계할 수 있는 방법이 있는지 문의가 왔다. Bedrock 요금은 기본적으로 하나의 모델에 대한 사용요금의 합계만 보여주는데 방법을 찾아보니 마침 작년 리인벤트에서 Bedrock Inference Profile을 이용해서 비용을 세분화할 수 있는 기능이 출시되었다(Inference Profile 사용에 따른 추가 비용은 없음).
- AWS re:Invent 2024 - Cost-optimized and scalable enterprise workload with Amazon Bedrock (https://youtu.be/P2fpid5AeNc)
- AWS What's new: Amazon Bedrock, 추론 프로필에 대한 비용 할당 태그 지원 발표
Amazon Bedrock Inference Profile(추론 프로필)이란? (AWS 공식 문서)
Bedrock의 Inference Profile은 한 개 이상의 리전으로 모델 호출 요청을 라우팅할 수 있도록 하는 Bedrock의 리소스로 대표적인 사용 용도는 다음 세 가지다.
- 사용 메트릭 추적: CloudWatch Logs를 설정하고 Application Inference profile로 모델을 호출하면 프로필별 호출 메트릭을 수집할 수 있다.
- 비용 세분화(오늘 블로그 내용): Application Inference Profile에 태그를 연결해 모델 호출 시 비용을 추적할 수 있다(온디맨드만 가능)
- 교차 리전(cross-region) 추론: 여러 리전을 포함하는 Inference Profile을 사용해 모델 호출을 여러 리전으로 분산하여 처리량, 성능을 향상
Inference Profile 유형
- System-Defined Inference Profile: Bedrock에서 제공하는 사전 정의된 프로필. 여러 리전으로 모델 요청을 라우팅 할 수 있다.
- Application Inference Profile: 사용자가 생성할 수 있는 프로필로 사용량 등을 추적하기 위해 구성. 단일 리전 모델을 설정하는 경우 해당 리전의 Foundation Model을, 여러 리전 모델을 설정하는 경우 System-Defined Inference Profile을 지정해 생성한다.
Inference Profile로 추적 가능한 요청
- 모델 추론 - Amazon Bedrock 콘솔의 Playground, InvokeModel, InvokeModelWithResponseStream, Converse 및 ConverseStream 작업을 호출할 때 추론 프로필의 ARN을 지정해 추론 프로필 사용 가능
- Knowledge base(KB) 벡터 임베딩 및 응답 생성 - KB 쿼리 후 응답을 생성하거나 데이터 소스에서 텍스트가 아닌 정보를 구문 분석할 때 추론 프로필 사용 가능
- 모델 평가 - 모델 평가 작업을 시 평가할 모델에 대해 추론 프로필 선택 가능.
- 프롬프트 관리 - 프롬프트 관리 기능에서 만든 프롬프트 응답 생성 시 추론 프로필 사용 가능
- Flows - 프롬프트 노드에서 인라인으로 정의한 프롬프트에 대한 응답 생성 시 추론 프로필 선택 가능
Amazon Bedrock Inference Profile로 비용 분리 집계 실습
Inference Profile은 25년 3월 현재 콘솔에서는 아직 생성이나 관리가 불가능하고 AWS CLI, boto3 라이브러리, Terraform으로 생성해야 한다. 리인벤트 영상에서는 SageMaker Notebook을 이용해 실습했고 나는 AWS CLI를 통해서 두 개의 Inference Profile을 생성하고 서로 다른 태그를 구성해서 각각 비용이 수집되는지 확인해보도록 하겠다.
1. service1_profile , service2_profile 라는 이름의 Inference Profile을 생성(CLI Docs 링크)한다.
aws bedrock create-inference-profile --profile <AWS Profile 이름 설정> --region us-west-2 --inference-profile-name service1_profile --model-source copyFrom=arn:aws:bedrock:us-west-2::foundation-model/anthropic.claude-3-5-sonnet-20241022-v2:0 --no-cli-pager
aws bedrock create-inference-profile --profile <AWS Profile 이름 설정> --region us-west-2 --inference-profile-name service2_profile --model-source copyFrom=arn:aws:bedrock:us-west-2::foundation-model/anthropic.claude-3-5-sonnet-20241022-v2:0 --no-cli-pager
2. 생성된 프로필을 확인해보자.
aws bedrock list-inference-profiles --type-equals APPLICATION --profile <AWS Profile 이름 설정> --region us-west-2 --no-cli-pager
{
    "inferenceProfileSummaries": [
        {
            "inferenceProfileName": "service1_profile",
            "description": "test inference profile",
            "createdAt": "2025-MM-DDT00:20:51.617878+00:00",
            "updatedAt": "2025-MM-DDT00:20:51.617878+00:00",
            "inferenceProfileArn": "arn:aws:bedrock:us-west-2:<AWS ACCOUNT ID>:application-inference-profile/bxxxxxxxxxxx",
            "models": [
                {
                    "modelArn": "arn:aws:bedrock:us-west-2::foundation-model/anthropic.claude-3-5-sonnet-20241022-v2:0"
                }
            ],
            "inferenceProfileId": "bxxxxxxxxxxx",
            "status": "ACTIVE",
            "type": "APPLICATION"
        },
        {
            "inferenceProfileName": "service2_claude_3_sonnet_profile",
            "description": "test inference profile",
            "createdAt": "2025-MM-DDT00:20:51.617878+00:00",
            "updatedAt": "2025-MM-DDT00:20:51.617878+00:00",
            "inferenceProfileArn": "arn:aws:bedrock:us-west-2:<AWS ACCOUNT ID>:application-inference-profile/axxxxxxxxxxx",
            "models": [
                {
                    "modelArn": "arn:aws:bedrock:us-west-2::foundation-model/anthropic.claude-3-5-sonnet-20241022-v2:0"
                }
            ],
            "inferenceProfileId": "axxxxxxxxxxx",
            "status": "ACTIVE",
            "type": "APPLICATION"
        }
    ]
}
3. Inference Profile에 태그를 연결해보자. 태그는 프로필 생성 후 추가하거나 프로필 생성시 --tags 옵션값을 줘서 구성할수도 있다.
- service1… 프로필에는 Service: service-1 태그 연결
- service@… 프로필에는 Service: service-2 태그 연결
aws bedrock tag-resource --profile <AWS Profile 이름 설정> --resource-arn arn:aws:bedrock:us-west-2:<AWS ACCOUNT ID>:application-inference-profile/bxxxxxxxxxxx --tags key=Service,value=service-1 --region us-west-2 --no-cli-pager
aws bedrock tag-resource --profile <AWS Profile 이름 설정> --resource-arn arn:aws:bedrock:us-west-2:<AWS ACCOUNT ID>:application-inference-profile/axxxxxxxxxxx --tags key=Service,value=service-2 --region us-west-2 --no-cli-pager
4. 연결된 태그를 확인해보면 아래처럼 태그가 잘 설정된 것을 확인할 수 있다.
$ aws bedrock list-tags-for-resource --resource-arn arn:aws:bedrock:us-west-2:<AWS ACCOUNT ID>:application-inference-profile/bxxxxxxxxxxx --region us-west-2 --no-cli-pager
{
    "tags": [
        {
            "key": "Service",
            "value": "service-1"
        }
    ]
}

$ aws bedrock list-tags-for-resource --resource-arn arn:aws:bedrock:us-west-2:<AWS ACCOUNT ID>:application-inference-profile/axxxxxxxxxxx --region us-west-2 --no-cli-pager
{
    "tags": [
        {
            "key": "Service",
            "value": "service-2"
        }
    ]
}
Amazon Bedrock Inference Profile 사용해보기
이번에는 생성된 프로필을 사용해보도록 하자. AI Engineering을 할 때에는 Python을 많이 사용해서 Python AWS SDK인 boto3를 활용해서 사용해보도록 하겠다(full version 코드는 aws-samples 링크 참조).
모델을 Invoke시 Inference Profile ARN을 넘겨서 호출하면 된다(Converse API로 호출하는 예시).
def parse_converse_response(response):
    """Parse Converse API response"""
    output = response.get('output', {})
    message = output.get('message', {})
    role = message.get('role')
    contents = message.get('content', [])

    # Extract the text content if available
    text_content = [item.get('text') for item in contents if 'text' in item]

    # Extract image data if available
    images = [
        {
            'format': item['image']['format'],
            'bytes': item['image']['source']['bytes']
        }
        for item in contents if 'image' in item
    ]

    # Extract document data if available
    documents = [
        {
            'format': item['document']['format'],
            'name': item['document']['name'],
            'bytes': item['document']['source']['bytes']
        }
        for item in contents if 'document' in item
    ]

    # Extract tool use and tool results if present
    tool_uses = [
        item.get('toolUse') for item in contents if 'toolUse' in item
    ]
    tool_results = [
        item.get('toolResult') for item in contents if 'toolResult' in item
    ]

    # Extract guardrail information if available
    guard_content = [
        item['guardContent'] for item in contents if 'guardContent' in item
    ]

    # Parse stop reason
    stop_reason = response.get('stopReason')

    # Parse token usage and metrics
    usage = response.get('usage', {})
    metrics = response.get('metrics', {})

    return {
        'role': role,
        'text_content': text_content,
        'images': images,
        'documents': documents,
        'tool_uses': tool_uses,
        'tool_results': tool_results,
        'guard_content': guard_content,
        'stop_reason': stop_reason,
        'usage': usage,
        'metrics': metrics
    }

def converse(model_id, messages):
    """Use the Converse API to engage in a conversation with the specified model"""
    response = bedrock_runtime.converse(
        modelId=model_id,
        messages=messages,
        inferenceConfig={
            'maxTokens': 300,  # Specify max tokens if needed
        }
    )

    status_code = response.get('ResponseMetadata', {}).get('HTTPStatusCode')
    print("Converse Response:", status_code)
    parsed_response = parse_converse_response(response)
    print(parsed_response)
    return response

# Converse 메서드를 사용해 Inference Profile로 모델 호출
print("\\nTesting Converse...")
prompt = "\\n\\nHuman: Amazon Bedrock에 대해 설명해줘.\\n\\nAssistant:"
messages = [{"role": "user", "content": [{"text": prompt}]}]
**response = converse(service1_profile_arn, messages)**
참고로 Bedrock Playground를 활용할 때에도 Model 선택 단계에서 Inference Profile을 지정해 호출할 수 있다.
Cost Explorer에서 집계된 비용 확인
1. 태그 연결 후 다음날부터 Cost Explorer에서 아래와 같이 태그별 리소스 확인할 수 있다(아래 예시의 경우 Dimension을 Tag로 설정한 후 적절한 키 값을 선택하고, Filters를 통해 Service 중 Bedrock 모델에 해당하는 것들을 선택하면 볼 수 있다).
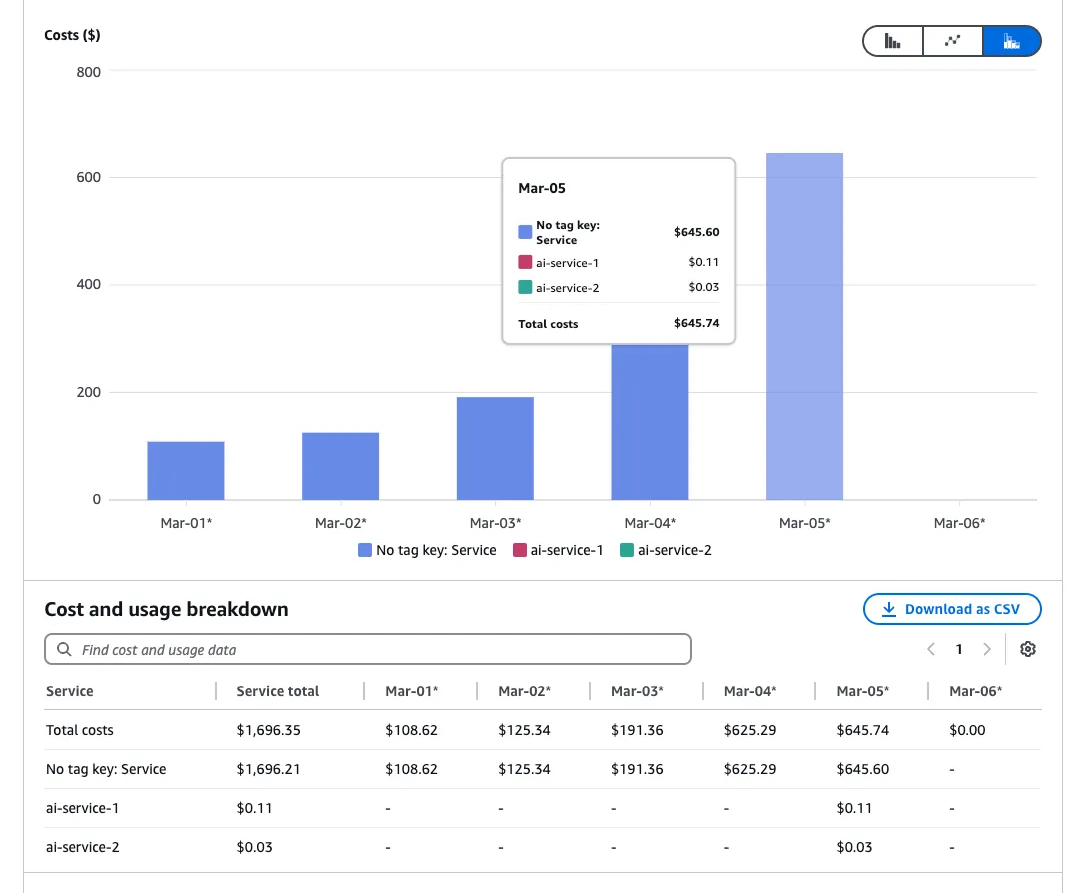
이렇게 추론 프로필 별 태깅 설정을 잘 해놓으면 서비스별/기능/팀별로 Bedrock 비용을 얼마나 사용했는 지 알 수 있고, AWS Budgets를 통해 특정 프로필에 해당하는 예산을 설정해 알람을 받을 수 있다(AWS Budget 설정 시 Dimension > Tag > 생성한 태그 value 선택해 구성).
'DevOps' 카테고리의 다른 글
| [Terraform]tfenv로 테라폼 버전 관리하기(테라폼 여러 버전 활용하기) (0) | 2025.03.20 |
|---|---|
| [MacOS]SSH config로 간편하게 EC2에 SSH 연결하기 (0) | 2025.03.20 |
| [AWS]Identity Center(SSO) SCIM 토큰 갱신 방법(Google Workspace) (0) | 2025.03.18 |
| [MongoDB]MongoServerSelectionError 에러 해결 방법 (1) | 2025.03.18 |
| [Kubernetes]GUI 클라이언트 OpenLens 설치 및 터미널, Log 보는 방법 (0) | 2025.03.15 |